Yao've done

Calm down, and keep on walking!


  • 首页

  • 分类

  • 归档

  • 标签

nginx安装

发表于 2016-03-17   |   分类于 nginx   |  

配置Linux服务器上的web服务器时,了解到nginx的相当牛掰,因此选用了nginx,但安装、卸载、配置中遇到了些问题,此处做下简要的笔记。
本机环境:

CentOS 7
php版本 5.6.17

安装依赖

nginx依赖于zlib、pcre、OpenSSL三个模块,安装nginx之前需要先安装这些依赖。为了保险起见,本文安装nginx之前,再安装一遍。安装方式为源码安装。
以下为本文的安装方式,不同时候版本可能存在差异,若参照且check版本。
安装zlib

1
2
3
4
5
6
7
8
9
10
11
12
13
14
15
16
17
18
19
20
# 安装zlib
wget http://zlib.net/zlib-1.2.8.tar.gz
tar -zxvf zlib-1.2.8.tar.gz
cd zlib-1.2.8
./configure
make && install

安装pcre
wget ftp://ftp.csx.cam.ac.uk/pub/software/programming/pcre/pcre-8.38.tar.gz
tar -zxvf pcre-8.38.tar.gz
cd pcre-8.38
./configure
make && install

安装openssl
wget http://www.openssl.org/source/openssl-1.0.2g.tar.gz
tar -zxvf popenssl-1.0.2g.tar.gz
cd openssl-1.0.2g
./configure
make && install

若没报错(error),扩展则安装完成。

安装nginx

使用wget获取nginx压缩文件

1
2
3
wget http://nginx.org/download/nginx-1.8.1.tar.gz
tar -zxvf nginx-1.8.1.tar.gz
cd nginx-1.8.1

然后是配置及编译。编译前,根据需要配置编译选项,可通过./configure –help查看,具体可参照help文档或者他们笔记。
本文此处配置为:

1
2
3
4
5
6
7
8
./configure --prefix=/usr/local/nginx \
--sbin-path=/usr/local/nginx/nginx \
--conf-path=/usr/local/nginx/nginx.conf \
--pid-path=/usr/local/nginx/nginx.pid \
--with-http_ssl_module \
--with-pcre=/root/installTemp/pcre-8.38 \
--with-zlib=/root/installTemp/zlib-1.2.8 \
--with-openssl=/root/installTemp/openssl-1.0.2g

其中

with-pcre=/root/installTemp/pcre-8.38 \
with-zlib=/root/installTemp/zlib-1.2.8 \
with-openssl=/root/installTemp/openssl-1.0.2g

是扩展模块的源代码目录,非安装目录。
配置完成后编译即可:

1
make && make install

无error,安装完成。

启动nginx

nginx默认端口80,若有其他应用占用,需要在/user/local/nginx/nginx.conf中的listen改为其他。
启动nginx命令:

1
/user/local/nginx/nginx

查看端口:

1
netstat -tnl | grep 80

访问URL::port,即可查看nginx运行效果。

Reference

笔记:https://www.zybuluo.com/phper/note/73025

nginx errors

发表于 2016-03-16   |   分类于 nginx   |  

此为nginx调试中出现的问题及处理方法,主要以mark为主。

基本调试方法

日志

nginx在conf之中,可以配置日志路径及日志格式,在若出现日志,最好把access log和error log打开,以定位问题。

错误类型1

错误提示:

1
2016/03/16 18:41:42 [error] 15849#0: *32 open() "/home/work/XXXX/XXX/public/XX" failed (2: No such file or directory), client: 1.202.225.154, server: 115.28.75.150, request: "GET /betme HTTP/1.1", host: "115.28.75.150"

该错误为conf文件中路径配置的问题,可参照nginx配置检查配置。

错误提示2

错误提示

1
2016/03/16 18:43:31 [error] 15849#0: *34 connect() failed (111: Connection refused) while connecting to upstream, client: 107.151.226.203, server: 115.28.75.150, request: "GET http://www.proxy-listen.de/azenv.php HTTP/1.0", upstream: "fastcgi://127.0.0.1:9000", host: "www.proxy-listen.de"

此错误可能是php-fpm没有安装的问题,参照博文,设置php-fpm即可。
安装nginx和php时多数已经安装,只是没有启动。因此,此处启动php-fpm。

1
2
3
4
5
6
#切换目录
cd /usr/local/php/etc
#cpdefault文件为conf文件
cp php-fpm.conf.default php-fpm.conf
#启动php-fpm
/usr/local/php/sbin/php-fpm

错误提示3

错误提示

1
2016/03/16 20:18:08 [error] 15891#0: *34 FastCGI sent in stderr: "Primary script unknown" while reading response header from upstream, client: 1.202.225.154, server: 115.28.75.150, request: "GET / HTTP/1.1", upstream: "fastcgi://127.0.0.1:9000", host: "115.28.75.150"

RESTful API

发表于 2016-03-16   |   分类于 HTTP   |  

具象状态传输(Representational State Transfer,REST)是Roy Thomas Fielding于2000年的论文Architectural Styles and the Design of Network-based Software Architectures中阐述的一种软件架构风格风格,其具有结构清晰、符合标准、易于理解、扩展方便的优点,被广泛采用。
此处参考阮一峰的文章,对RESTful API做简要介绍。

协议

通信使用HTTP协议

域名

应尽量将API部署到专用域名下,如:

1
https://api.example.com

版本(Version)

若有,应将版本放入URL。如:

1
https://api.example.com/v1/

路径

在RESTful架构中,每一个网址都代表一种资源,所有网址中应尽量避免出现动词,只能有名词。且根据实际情况,名词需要考虑是否为复数。
如对一个学校,有教师、学生、教室信息,则其API则应为:

1
2
3
https://api.example.com/v1/teachers
https://api.example.com/v1/students
https://api.example.com/v1/classmates

HTTP Verbs

HTTP动词定义了资源的具体操作类型,最常用的动词为GET和POST,具体有:

GET(SELECT):从服务器取出资源(一项或多项)。
POST(CREATE):在服务器新建一个资源。
PUT(UPDATE):在服务器更新资源(客户端提供改变后的完整资源)。
PATCH(UPDATE):在服务器更新资源(客户端提供改变的属性)。
DELETE(DELETE):从服务器删除资源。
HEAD:获取资源的元数据。
OPTIONS:获取信息,关于资源的哪些属性是客户端可以改变的。

其中,需要区别POST、PUT、PATCH的使用区别,可参照此文。

状态码

HTTP状态码表示了一个操作的结果,由服务器返回,常见的有:

200 OK - [GET]:服务器成功返回用户请求的数据,该操作是幂等的(Idempotent)。
201 CREATED - [POST/PUT/PATCH]:用户新建或修改数据成功。
202 Accepted - []:表示一个请求已经进入后台排队(异步任务)
204 NO CONTENT - [DELETE]:用户删除数据成功。
400 INVALID REQUEST - [POST/PUT/PATCH]:用户发出的请求有错误,服务器没有进行新建或修改数据的操作,该操作是幂等的。
401 Unauthorized - [
]:表示用户没有权限(令牌、用户名、密码错误)。
403 Forbidden - [] 表示用户得到授权(与401错误相对),但是访问是被禁止的。
404 NOT FOUND - [
]:用户发出的请求针对的是不存在的记录,服务器没有进行操作,该操作是幂等的。
406 Not Acceptable - [GET]:用户请求的格式不可得(比如用户请求JSON格式,但是只有XML格式)。
410 Gone -[GET]:用户请求的资源被永久删除,且不会再得到的。
422 Unprocesable entity - [POST/PUT/PATCH] 当创建一个对象时,发生一个验证错误。
500 INTERNAL SERVER ERROR - [*]:服务器发生错误,用户将无法判断发出的请求是否成功。

详细可参照w3官方文档

其他

  • API的身份及安全由OAuth 2.0控制
  • 交互的数据应尽量使用JSON。

Reference

WIKI:https://zh.wikipedia.org/wiki/REST
REST论文:http://www.ics.uci.edu/~fielding/pubs/dissertation/top.htm
阮一峰博客:http://www.ruanyifeng.com/blog/2014/05/restful_api.html
HTTP Verbs:https://ihower.tw/blog/archives/6483

Laravel随笔(二):MVC

发表于 2016-03-15   |   分类于 Laravel   |  

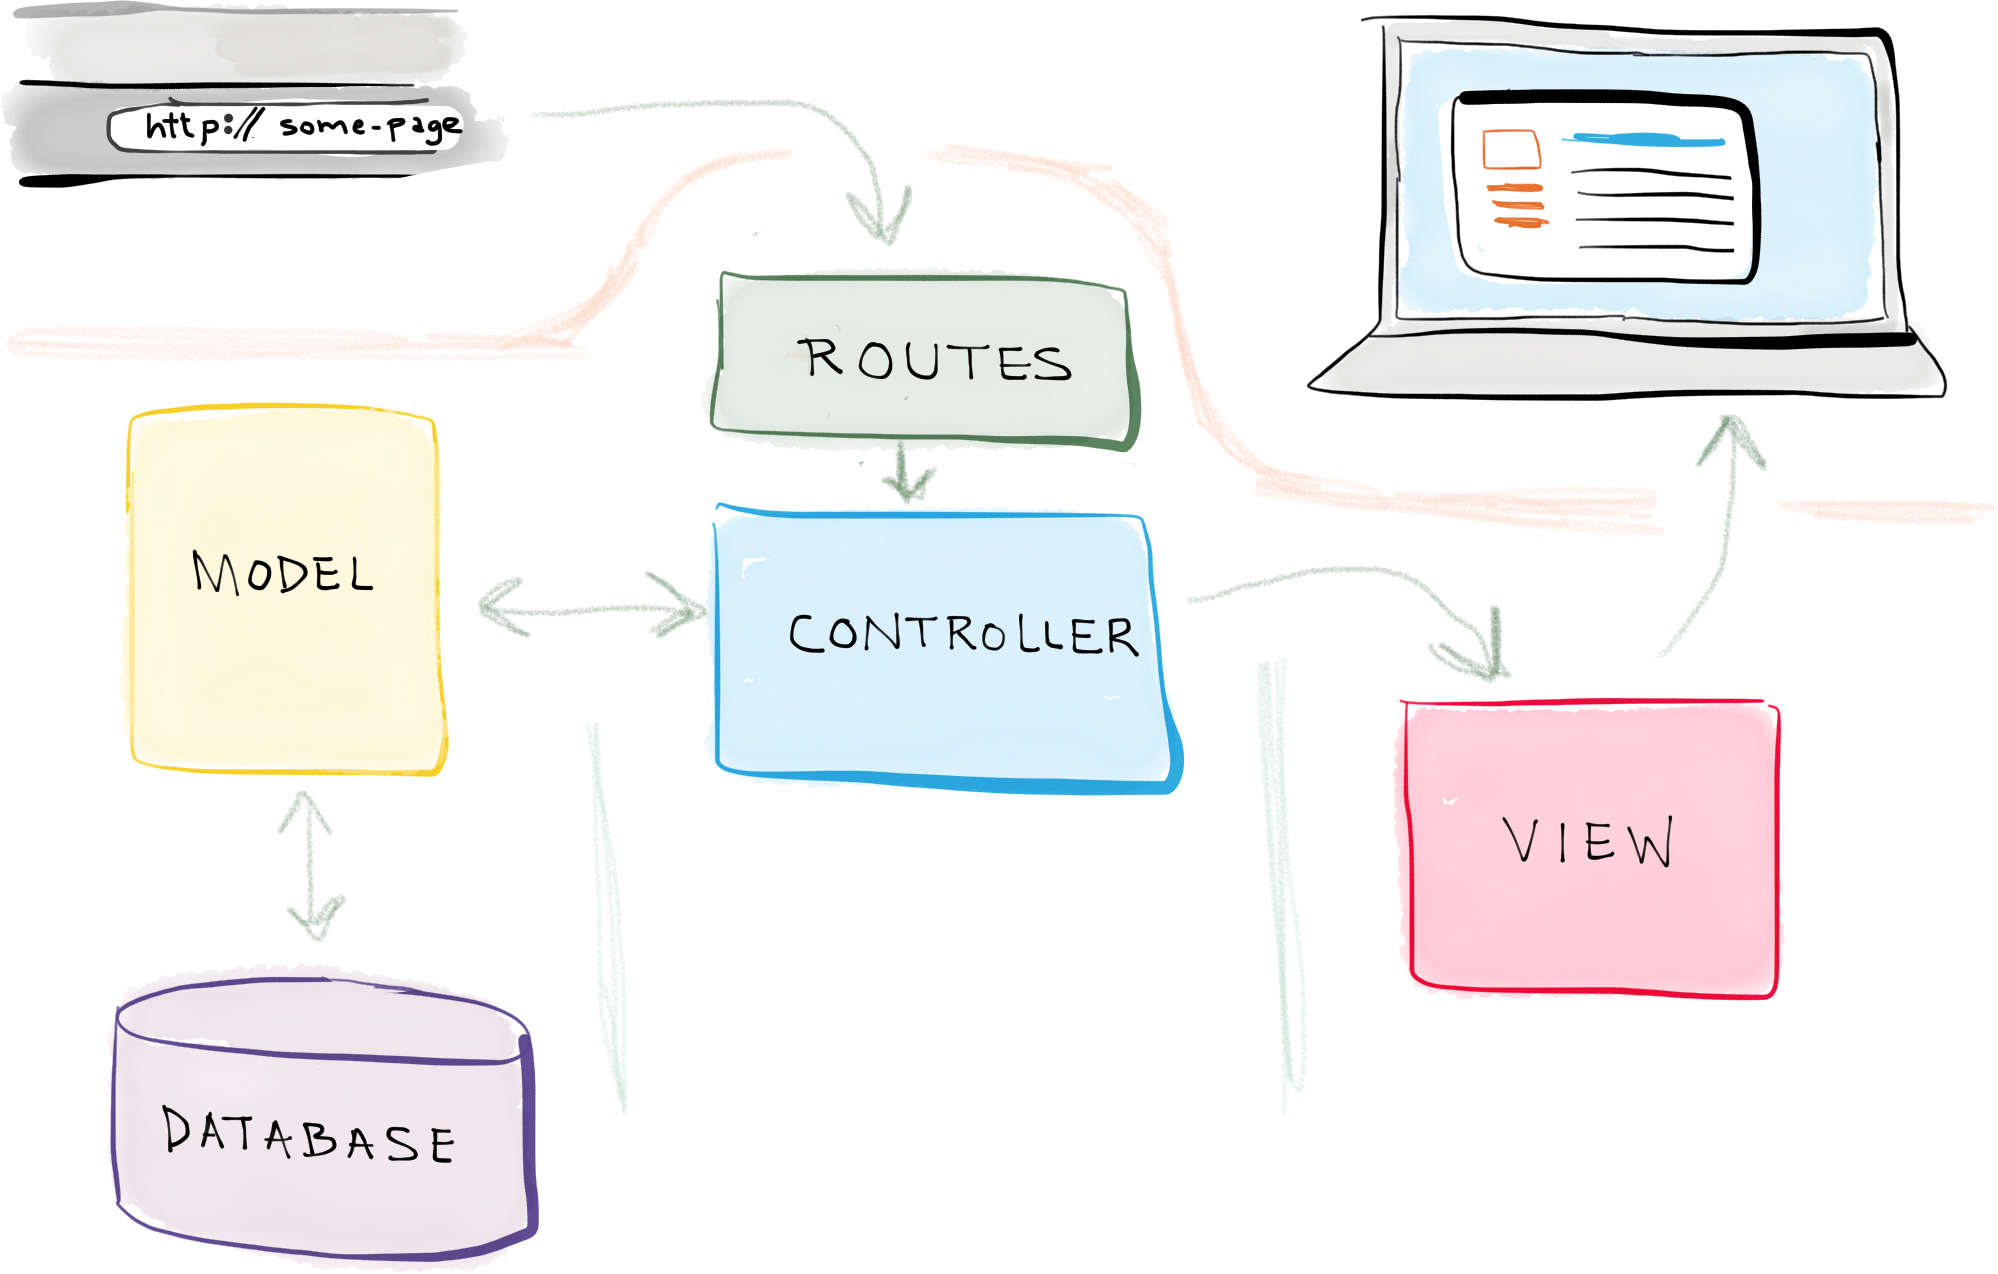
Laravel遵从MVC的设计原则,同时,routes用于映射URL到具体的controller,示例如图所示
Laravel MVC
数据图片来源于self-taught coders。
因此,一个完整的访问流程可以总结为:

  • 用户输入URL访问应用
  • route映射URL和对应的controller
  • controller通过model访问数据库,获取数据,并将其传输到view
  • view渲染前台页面

下面,通过实例简要介绍Laravel 5的MVC应用。

Model

以车辆为例,创建一个Model。在此之前,首先要设置DB

Laravel DB设置

Laravel的DB可在env文件中简单配置,也可在config/database.php文件中配置,若同时存在,则会已env文件中读取的为主。为了避免引起歧义,此处将读取env环境变量的函数(如env(‘DB_HOST’, ‘localhost’))去除。本文使用MySQL,设置host、database、username、password,示例如下:

1
2
3
4
5
6
7
8
9
10
11
12
13
14
15
'default' => 'mysql',

'mysql' => [
'driver' => 'mysql',
'host' => 'localhost',
'database' => 'test',
'username' => 'develop',
'password' => 'develop',
'charset' => 'utf8',
'collation' => 'utf8_unicode_ci',
'prefix' => '',
'strict' => false,
'engine' => null,
],
],

如此,默认的DB连接为MySQL,连接为”mysql”,如上所示。

创建Model

此处安利Laravel自带的Artisan CLI工具,其中集成了大量的命令。
使用Artisan CLI创建一个Model,命令如下:

1
2
# 创建Model,同时写入数据库(--migration)
php artisan make:model Car --migration

创建完成后,在app下有个Car.php的文件,该文件即为通过Artisan创建的Model,文件内容为:

1
2
3
4
5
6
7
8
9
10
<?php

namespace App;

use Illuminate\Database\Eloquent\Model;

class Car extends Model
{

//
}

同时,Laravel支持通过Artisan工具创建数据库表。因此,在database\migrations下生成了一个2016_03_15_124343_create_cars_table.php文件,内容为:

1
2
3
4
5
6
7
8
9
10
11
12
13
14
15
16
17
18
19
20
21
22
23
24
25
26
27
28
29
30
<?php

use Illuminate\Database\Schema\Blueprint;
use Illuminate\Database\Migrations\Migration;

class CreateCarsTable extends Migration
{

/**
* Run the migrations.
*
* @return void
*/

public function up()
{

Schema::create('cars', function (Blueprint $table) {
$table->increments('id');
$table->timestamps();
});
}

/**
* Reverse the migrations.
*
* @return void
*/

public function down()
{

Schema::drop('cars');
}
}

此处对数据库表增加几个make、model、produced_on这三个属性。

1
2
3
4
5
6
7
Schema::create('cars', function (Blueprint $table) {
$table->increments('id');
$table->string('make');
$table->string('model');
$table->string('produced_on');
$table->timestamps();
});

然后在执行migrate命令:

1
php artisan migrate

数据库中则成功创建表:cars。然后,可使用Database: Seeding填充数据。本文此处略过。

创建Controller

在Laravel中,一个对象,如上面创建的Car,被定义为resource,对于每个resource,Laravel中普遍使用resource controller管理关于该资源的所有请求。此处可用Artisan命令行创建controller:

1
php artisan make:controller CarController

会生成一个controller文件,路径为:app/Http/Controllers/CarController.php,文件为:

1
2
3
4
5
6
7
8
9
10
11
12
13
14
15
16
17
18
<?php

namespace App\Http\Controllers;

use Illuminate\Http\Request;

use App\Http\Requests;

use App\Car;

class CarController extends Controller
{

public function index()
{

$car = Car::all();
return view('cars.all', array('cars' => $car));
}
}

routes

然后定义routes,在app/Http/routes.php中增加以下代码:

1
Route::resource('cars', 'CarController');

routes介绍参照官网。

创建view

Laravel默认使用blade模板引擎渲染前端页面
此处展示所有车辆,首先根据以上的路由配置,在controller里面配置index函数,默认返回所有车辆数据。代码如下:

1
2
3
4
5
6
7
8
9
10
11
12
13
14
15
16
<?php

namespace App\Http\Controllers;

use Illuminate\Http\Request;

use App\Http\Requests;

class CarController extends Controller
{

public function index()
{

$car = Car::findAll();
return view('cars.show', array('car' => $car));
}
}

然后创建view文件,路径为:resources/views/cars/all.blade.php,使用blade模板引擎渲染数据,demo如下:

1
2
3
4
5
6
7
8
9
10
11
12
13
14
15
16
17
18
19
20
21
22
23
24
25
26
27
28
29
30
31
32
33
34
35
36
37
38
39
40
41
42
43
44
45
46
47
48
49
50
<!DOCTYPE html>
<html>
<head>
<title>Laravel</title>

<h2nk href="https://fonts.googleapis.com/css?family=Lato:100" rel="stylesheet" type="text/css">

<style>
html, body {
height: 100%;
}


body {
margin: 0;
padding: 0;
width: 100%;
display: table;
font-weight: 100;
font-family: 'Lato';
}


.container {
text-ah2gn: center;
display: table-cell;
vertical-ah2gn: middle;
}


.content {
text-ah2gn: center;
display: inh2ne-block;
}


.title {
font-size: 96px;
}

</style>

</head>
<body>
<div class="container">
<div class="content">
@foreach($cars as $car)
<h1>Car {{ $car->id }}</h1>
<h2>{{ $car->make }}</h2>
<h2>{{ $car->model }}</h2>
<h2>{{ $car->produced_on }}</h2>
@endforeach
</div>
</div>
</body>
</html>

访问链接:http://localhost/cars ,效果如图所示。
Laravel默认图

Apache配置多主机和虚拟目录

发表于 2016-03-14   |   分类于 Apache   |  

相当广泛的需求吧,一个开发机上需要同时发布多个项目=.=,找到一篇文章,根据该文折腾了一下,挺好使的,此处做一下笔记

虚拟目录

假设一个网站的网站根目录在 D:\Program Files\Web ,现在又有一个新的web应用,其目录在 D:\Program Files\demo ,为了此处能够同时访问根目录下的web应用和demo下的web应用,此处可使用虚拟目录实现。
打开http.conf,搜索节点,然后在节点中添加以下内容:

1
2
3
4
5
6
7
8
9
10
11
12
13
14
15
16
17
18
19
20
21
#下面是虚拟目录声明格式
#Alias用来定义虚拟目录及虚拟目录路径,其中虚拟目录名称用于URL访问的路径别名,可以和虚拟目录名称不同
#<Directory/>节点用于定义目录的访问权限等
#
#Alias 虚拟目录名称 虚拟目录路径
#<Directory 虚拟目录路径>
# Options Indexes FollowSymLinks
# AllowOverride All
# Order allow,deny
# Allow from all
#</Directory>

#下面是具体的示例,/DemoSite是目录别名 "D:/Program Files/demo"是虚拟目录的实际路径
Alias /DemoSite "D:/Program Files/demo"

<Directory "D:/Program Files/demo">
Options Indexes FollowSymLinks
AllowOverride All
Order allow,deny
Allow from all
</Directory>

重启Apache服务,在浏览器输入:http://localhost/demo 即可访问
和参考文档中相比,配置默认端口故URL中不输入URL
附上一个完整的节点参考

1
2
3
4
5
6
7
8
9
10
11
12
13
14
15
16
17
18
19
20
21
22
23
24
25
26
27
28
29
30
31
32
33
34
35
36
37
38
<IfModule alias_module>
#
# Redirect: Allows you to tell clients about documents that used to
# exist in your server's namespace, but do not anymore. The client
# will make a new request for the document at its new location.
# Example:
# Redirect permanent /foo http://www.example.com/bar

#
# Alias: Maps web paths into filesystem paths and is used to
# access content that does not live under the DocumentRoot.
# Example:
# Alias /webpath /full/filesystem/path
#
# If you include a trailing / on /webpath then the server will
# require it to be present in the URL. You will also likely
# need to provide a <Directory> section to allow access to
# the filesystem path.

#
# ScriptAlias: This controls which directories contain server scripts.
# ScriptAliases are essentially the same as Aliases, except that
# documents in the target directory are treated as applications and
# run by the server when requested rather than as documents sent to the
# client. The same rules about trailing "/" apply to ScriptAlias
# directives as to Alias.
#
ScriptAlias /cgi-bin/ "D:/Program Files (x86)/xampp/cgi-bin/"

Alias /betme "D:/PHP/laravel/laravel2016/betMe/public"

<Directory "D:/PHP/laravel/laravel2016/betMe/public">
Options Indexes FollowSymLinks
AllowOverride All
Order allow,deny
Allow from all
</Directory>
</IfModule>

多主机绑定

即一个端口绑定多个域名,通过域名访问不同的目录。
打开http.conf文件,在文件的末尾添加以下内容

1
2
3
4
5
6
7
8
9
10
11
12
13
14
15
16
#多主机头配置无需放在特定的节点下面,一般直接在配置文件底部添加即可
#NameVirtualHost addr[:port] 为一个基于域名的虚拟主机指定一个IP地址(和端口)
#声明主机头必须加这条指令,否者主机头配置不会生效
#VirtualHost节点下面ServerName就是要绑定的域名,DocumentRoot表示此域名指向的目录
#本机测试的话请在hosts中进行域名绑定如 127.0.0.1 www.mysite1.com

NameVirtualHost *:8080
<VirtualHost *:8080>
ServerName www.mysite1.com
DocumentRoot "D:\Program Files\Apache2.2\htdocs"
</VirtualHost>

<VirtualHost *:8080>
ServerName www.mysite2.com
DocumentRoot "D:\Code\MySite"
</VirtualHost>

配置完成后,重启Apache浏览器输入www.mysite1.com:8080,就会自动定向到D:\Program Files\Apache2.2\htdocs站点了
输入www.mysite2.com:8080就会自动定向到D:\Code\MySite站点,如此就可以实现在一个服务器上同时运行多个站点

引用

Apache配置虚拟目录和多主机头:http://www.cnblogs.com/lzrabbit/archive/2013/03/05/2944804.html

composer中国全量镜像

发表于 2016-03-14   |   分类于 Composer   |  

Composer中国镜像

composer是一个php依赖管理的工具,其中缓存了大量的项目和安装包,但由于在可能被墙,故可配置国内镜像,配置方式如下

修改 composer 全局配置文件(推荐方式)
1
composer config -g repo.packagist composer https://packagist.phpcomposer.com

详情参照官方文档

Laravel随笔(一):简介

发表于 2016-03-11   |   分类于 Laravel   |  

Love beautiful code? We do too.

—— Laravel

Introduction

用PHP半年多了,读研的时候做项目用的Java,其中写图像也用过C++,但PHP给人感觉很随性,@龙哥所说,字符串配上数组走天下。
关于框架,才来公司的时候,根据公司的业务,用过F3框架和boss自己写的一个框架,要么结构混乱,文件堆积太多,要么库和支持太少,总想自己折腾下。
google、知乎了一下,Laravel备受青睐,如排行榜
PHP框架排行
来源于sitepoint报告。
且Laravel简洁大方的的风格,瞬间吸引了我,Po一张图
Laravel默认图
因此,一起来折腾O(∩_∩)O

安装

参考Laravel官方文档

服务器要求

若非使用Laravel Homestead,安装Laravel之前,需对环境有一定要求,具体如下(此处版本5.2):

  • PHP >= 5.5.9
  • OpenSSL PHP Extension
  • PDO PHP Extension
  • Mbstring PHP Extension
  • Tokenizer PHP Extension

安装Laravel

Laravel使用Composer管理其依赖,故在安装前,需先确认是否安装Composer。若在国内,最好还设置中国镜像。

通过Laravel安装

首先,使用Composer下载Laravel安装程序

1
composer global require "laravel/installer"

请确保 ~/.composer/vendor/bin 目录在你的 PATH 中。这样,Laravel 可执行文件才会被系统定位并执行。
安装完成之后,可通过命令laravel new创建全新的Laravel到执行目录,且该方法比通过Composer安装更快,命令如:

1
2
# 安装一个名为blog的Laravel
laravel new blog

通过Composer安装

使用Composer的create-project安装Laravel:

1
2
# 可通过[blog]执行项目名
composer create-project laravel/laravel [blog] --prefer-dist

配置

此处参考Laravel官方文档

Reference

Laravel官方文档:https://laravel.com/docs/5.2/installation
laracasts视频教程:https://laracasts.com/series/laravel-5-from-scratch/episodes/1

centos rz sz安装

发表于 2016-03-10   |   分类于 Linux   |  

使用yum安装,命令如下:

1
2
#安装命令
yum install lrzsz

ssh key登录Linux

发表于 2016-03-10   |   分类于 Linux   |  

生成ssh key

在Window下,可通过以下命令生成

1
ssh-keygen -t rsa -C "name@example.com"

Linux下

1
ssh-keygen -t rsa

生成过程中需要输入密码,密码为空直接回车即可。
然后得到id_rsa(私钥)、id_rsa.pub(公钥)。

ssh key登录

生成key后,将公钥上传到Linux服务器。对于需要使用ssh key进行登录的用户进行配置,以work为例。
在Linux服务器中:

1
2
3
4
5
6
7
8
9
10
# 切换到work目录
cd /home/work
# 创建.ssh目录
mkdir .ssh
#创建授权文件(可以将key上传之后,直接mv得到,以防复制出错。若生成秘钥使用的是ssh2,则还需新建authorized_keys2文件)
mv id_rsa.pub authorized_keys
mv id_rsa.pub authorized_keys2
# 修改权限(重要)
chmod 700 .ssh
chmod 644 .ssh/*

之后使用私钥即可登录work账户

常见错误

使用ssh 登录时,在客户端可能报错:

1
Permission denied (publickey,gssapi-keyex,gssapi-with-mic).

其实此类错误,主要查看ssh登录日志可发现大多数错误原因。
查看登录日志:

1
2
cd /var/log/
tail -f secure

可得知失败原因为:

1
2
3
Mar 23 10:18:40 iZ25t206jm9Z sshd[2826]: User git not allowed because account is locked
Mar 23 10:18:40 iZ25t206jm9Z sshd[2826]: input_userauth_request: invalid user git [preauth]
Mar 23 10:18:40 iZ25t206jm9Z sshd[2826]: Connection closed by 1.202.225.154 [preauth]

由于用户被锁。
stackoverflow中有解答,原因为:

On Linux systems, locked accounts are defined as those that have !! in the password field of /etc/shadow.
This is the default entry for accounts created with the useradd command.

原因是设置用户时,没有设置用户用户密码,导致用户被锁,设置用户密码或把密码域的!!改掉即可。

Linux nginx操作

发表于 2016-03-10   |   分类于 Linux   |  

启动

1
2
3
4
5
# 查看nginx是否运行
ps aux | grep nginx
# 若没有启动,root权限下启动nginx
cd /usr/sbin/nginx
./nginx

重启

1
2
3
4
5
6
# 测试
cd /usr/sbin/nginx
./nginx -t
# 重启
cd /usr/sbin/nginx
./nginx -s reload

关闭

1
2
3
4
5
6
7
8
# 查询进程
ps aux | grep nginx
# 从容停止
kill -QUIT 主进程号
# 快速停止
kill -TERM 主进程号
# 强制停止
kill -9 nginx
123
dam叶

dam叶

Lazy boy write lazy blog

29 日志
15 分类
31 标签
RSS
github weibo zhihu
© 2016 dam叶
由 Hexo 强力驱动
主题 - NexT.Muse