Yao've done

Calm down, and keep on walking!


  • 首页

  • 分类

  • 归档

  • 标签

Go学习笔记(二):tutorial学习

发表于 2016-06-30   |   分类于 Go   |  

tour

Go的基本语言及数据结构学习,可参照Go 指南。
其中有部分联系题,练习题答案参照夏令blog

安装tour包

其中部分练习题需要引用tour下的文件,如练习:map该题中,官方给的参考代码为:

1
2
3
4
5
6
7
8
9
10
11
12
13
package main

import (
"code.google.com/p/go-tour/wc"
)

func WordCount(s string) map[string]int {
return map[string]int{"x": 1}
}

func main() {
wc.Test(WordCount)
}

直接根据该参考代码无法运行,因为“code.google.com/p/go-tour/wc”为第三方包,需要先安装才能使用。

官方安装

在命令行中执行:

1
go get code.google.com/p/go-tour/wc

安装该tour包。
如果,你已经配置了VPN,可以成功,否则会被报错,如下:

1
2
package code.google.com/p/go-tour/wc: Get https://code.google.com/p/go-tour/source/checkout?repo=: dial tcp 74.
125.204.113:443: i/o timeout

提示很明显,即timeout(超时),大陆访问code.google被墙了。

GitHub安装

该tour同样托管在Github上,托管地址:https://github.com/golang/tour
然后通过该托管源码安装tour。
该问题有部分issue讨论,地址为:https://github.com/golang/go/issues/9976
总结实验后,可行的方式(中国大陆,windows环境)为:

安装tour

在命令行中输入:

1
go get github.com/golang/tour

可在$GOPATH下看到一个src的文件夹,里面即为GitHub上的代码,目录结构也与GitHub上相同。

使用tour

当前可使用get的代码完成练习:map,解答代码为:

1
2
3
4
5
6
7
8
9
10
11
12
13
14
15
16
17
18
19
package main

import (
"golang.org/x/tour/wc"
"strings"
)

func WordCount(s string) map[string]int {
result := map[string]int {}
f := strings.Fields(s)
for _, v := range f {
result[v] += 1
}
return result
}

func main(){
wc.Test(WordCount)
}

运行该代码,提示:

1
2
3
test.go:7:2: cannot find package "golang.org/x/tour/wc" in any of:
D:\Program Files (x86)\Go\src\golang.org\x\tour\wc (from $GOROOT)
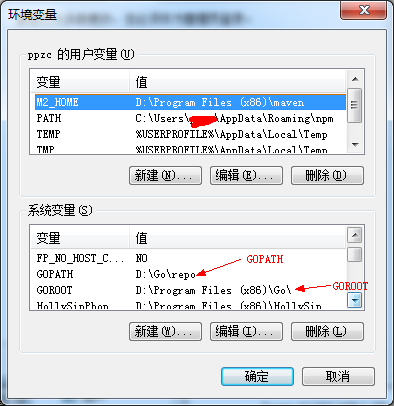
D:\Go\repo\src\golang.org\x\tour\wc (from $GOPATH)

“golang.org/x/tour/wc”依旧不存在。由于我们使用GitHub上的代码,故import的路径也需要相应更改,更改之后的代码为:

1
2
3
4
5
6
7
8
9
10
11
12
13
14
15
16
17
18
19
package main

import (
"strings"
"github.com/golang/tour/wc" //更为真实路径
)

func WordCount(s string) map[string]int {
result := map[string]int {}
f := strings.Fields(s)
for _, v := range f {
result[v] += 1
}
return result
}

func main() {
wc.Test(WordCount)
}

再次运行,依旧报错,提示:

1
test.go:6:2: code in directory D:\Go\repo\src\github.com\golang\tour\wc expects import "golang.org/x/tour/wc"

我们查看D:\Go\repo\src\github.com\golang\tour\wc.go源代码,发现其源代码package后有个注释,代码为:

1
2
3
4
5
6
7
// Copyright 2011 The Go Authors.  All rights reserved.
// Use of this source code is governed by a BSD-style
// license that can be found in the LICENSE file.

package wc // import "golang.org/x/tour/wc"

import "fmt"

此处使用注释,规定了import的方式,由于我们的实际路径和此处不同,故此import建议应该被去除或换为我们自己的路径方式。
去除// import “golang.org/x/tour/wc”,然后再次运行代码:

1
go run test.go

得到正确结果,如下所示:

1
2
3
4
5
6
7
8
9
10
11
12
PASS
f("I am learning Go!") =
map[string]int{"I":1, "am":1, "learning":1, "Go!":1}
PASS
f("The quick brown fox jumped over the lazy dog.") =
map[string]int{"quick":1, "brown":1, "the":1, "dog.":1, "The":1, "jumped":1, "over":1, "lazy":1, "fox":1}
PASS
f("I ate a donut. Then I ate another donut.") =
map[string]int{"a":1, "donut.":2, "Then":1, "another":1, "I":2, "ate":2}
PASS
f("A man a plan a canal panama.") =
map[string]int{"A":1, "man":1, "a":2, "plan":1, "canal":1, "panama.":1}

总结:此处应该属于google code的代码迁移到Github,但有的细节没更改完成导致的。

Go学习笔记(一):环境配置

发表于 2016-06-30   |   分类于 Go   |  

Go Golang~

安装

从官网下载安装文件,安装即可。
官网地址:https://golang.org/dl/
以windows为例,此文最新版本1.6.2,下载地址:https://golang.org/doc/install?download=go1.6.2.windows-amd64.msi
下载的.msi文件可直接安装,默认安装路径为:c:\Go,安装过程中可更改路径,如D:\Program Files\Go\

配置

加入Path

安装完成之后,需把Go加入环境变量中。
以Windows为例,如安装路径为D:\Program Files\Go\,则在系统的Path中添加D:\Program Files\Go\bin。

配置GOROOT & GOPATH

安装完成后,默认会配置GOROOT,若没配置,可新建变量,其值为Go的安装目录,本文案例中为D:\Program Files\Go。
GOPATH则与Go的workspace概念直接相关,且是go install、go get等命令的工作路径,若不配置该变量,使用以上命令时会报错。具体可参照下文:http://studygolang.com/articles/5936
此处,配置GOPATH。结果如截图所示:
Go配置

Go工作空间浅析

Go的工作空间可参照博文:http://studygolang.com/articles/5936
该博文大多数都讲解得比较细致。但关于bin文件夹的讲解略有缺失,在此补充。
使用go install吧编译.go文件,可在pkg中得到二进制的包,但不一定会在bin中得到可执行的二进制文件。
只有编译的源文件中有package为main,且代码中有main函数的情况下,才会在bin中编译得到可执行二进制文件。

Brief Interview

发表于 2016-06-27   |   分类于 interview   |  

此为Server端面试的一些常见知识点,仅做参考。

Introduction

常见的面试过程,大概可分为基础知识+项目经验。其中项目经验各有差异,但若项目经验中与面试部门的业务相关,相对会有优势。
基础知识点可大概分为:语言、算法(部分需要讲出思路或者手写代码)、数据库、网络、Linux、操作系统等。
总结性的可参照此python面试题

语言

语言面试与各个公司的招聘需求相关。

PHP

PHP语言本身,学习的话,可参照菜鸟教程-PHP,其核心在于字符串以及数组。
由于PHP是以web开发为主,且部分前端可能要PHP工程师自己完成,故PHP面试常与服务器、数据库、nginx。前端同时问,可参照网上常见面试题:
oschina、知乎等。

Java

Java可在牛客网上找些面经参考。
其中,Java虚拟机、垃圾回收、集合类型(Collection Utils)、线程等。Spring等Java框架也会有所涉及。
可参照GitBook

算法

算法可大概归类为字符串操作、排序、树操作等。此方面准备可参照《剑指offer》、《编程之美》等书籍,以及网上的一些教程、面试题等,推荐:
july算法讲解、Leetcode(该题刷部分即可,主要找感觉,网上有大量讲解)

数据库

数据库主要考察SQL语句,数据库索引等
另外,Redis、memcached等也会考察。
参照:
Redis面试题:http://www.100mian.com/mianshi/dba/37381.html

网络

网络部分,参见参照此python面试题中的网络部分

Python3爬虫学习(一):糗百 & 百度贴吧

发表于 2016-06-24   |   分类于 python   |  

Introduction

爬虫接触很浅,但有时候自己折腾玩的时候,通过爬虫获取数据是一种比较好的方式。之前做项目的时候接触过PHP的爬虫,其本质是通过curl模拟网络请求,对爬虫有了个大概的认识。而Python爬虫最为火爆,因此想抽空折腾折腾。

学习资料

网上找了篇教程了解了下,Python爬虫主要在于:Python基本语法、urllib库应用、Python爬虫框架。其中,
Python基础语法:参照了廖雪峰
urllib则以官方doc为主
爬虫框架及爬虫概念,参照了崔庆才的博客

比较Python2和Python3,想尝试用新的技术,故选用Python3作为工具。学习过程中,参照崔庆才的博客做了些demo(原文基于Python2.7实现),可参照github demo

Laravel后台系统实战(四):中间件应用之侧边栏选中

发表于 2016-03-30   |   分类于 Laravel实战   |  

本文项目的GitHub地址为:GitHub地址,可参考。

前言

之前例子的页面中,无论点击“Users”还是“Tasks”,侧边栏相应的位置都未被选中,即无法直观地得知当前页面是点击那个侧边栏标签进入的。其中Bootstrap提供了css样式,可以显示选中,如:

1
<li class="active"><a href="{{ url('/user') }}">Users</a></li>

但若将该以上语句写死,则无法动态切换,如选中“Tasks”时,就无法正常显示。因此,需要考虑动态显示的方案。
常见的处理方案可分为两种。
其一为动态生成网页的侧边栏,即根据配置及当前的选中,生成侧边栏、顶部栏,然后再和主体拼接得到完整的网页。可写个SideBar的类完成该操作,扩张性较好。
另外,可将当前的选中返回前台页面,然后前端通过逻辑处理选中,该方法实现上较简单,因此此处使用该方式。
Laravel中提供了中间件,用于处理一些HTTP请求、身份验证等功能,同时还有用于运行各种任务。
本章此需求的思路为:

解析URL中主机地址后的模块名
将该模块名返回到前端

因此,此处使用中间件实现该功能。

创建中间件

在Artisan命令行中创建中间件:

1
php artisan make:middleware RequestRoute

在该中间件中处理请求的URL。
中间件的处理可在基本逻辑之前或之后,由于要在视图中显示请求URL后的模块名,故此处使用view的share方法,在填充view层数据之前,将该数据共享给view,具体可参照sharing data with all views。
该中间件参照代码:

1
2
3
4
5
6
7
8
9
10
11
12
13
14
15
16
17
18
19
20
21
22
23
24
25
26
27
28
29
30
<?php

namespace App\Http\Middleware;

use Closure;

class RequestRoute
{

/**
* process url for selected
* this work must handle before fill view data
*
* @param \Illuminate\Http\Request $request
* @param \Closure $next
* @return mixed
*/

public function handle($request, Closure $next)
{

// parse url
preg_match('/^http:\/\/([\w.]+)\/([\w]+)/i', $request->url(), $matches);

// add share view
if(!empty($matches[2]))
{
view()->share('requestRoute',$matches[2]);
}

return $next($request);
}
}

此处需使用share view实现该功能。其中尝试过先填充view,然后再获取response,再重新在获取到的content里面赋值,重新封装为response,该种方式有问题,具体原因不详。以上方式测试通过。

注册中间件

生成中间件之后,在app/Http/Kernel.php中注册注册中间件,如下所示:

1
2
3
4
5
6
7
protected $routeMiddleware = [
'auth' => \App\Http\Middleware\Authenticate::class,
'auth.basic' => \Illuminate\Auth\Middleware\AuthenticateWithBasicAuth::class,
'guest' => \App\Http\Middleware\RedirectIfAuthenticated::class,
'throttle' => \Illuminate\Routing\Middleware\ThrottleRequests::class,
'request.route' => \App\Http\Middleware\RequestRoute::class,
];

注册的中间件为request.route。

路由中添加中间件

注册之后,在路由中添加,对需要的部分路由添加该中间件,添加如下为例:

1
2
3
4
5
6
Route::group(['middleware' => ['web', 'request.route']], function () {

Route::resource('task', 'TaskController');
Route::resource('user', 'UserController');
Route::auth();
});

同时添加web、request.route。

前端显示

最后,在前端选中。此处使用了Laravel的blade模板,程序示例为:

1
2
3
4
<ul class="nav nav-sidebar">
<li @if(isset($requestRoute)) @if($requestRoute == 'user') class="active" @endif @endif><a href="{{ url('/user') }}">Users</a></li>
<li @if(isset($requestRoute)) @if($requestRoute == 'task') class="active" @endif @endif><a href="{{ url('/task') }}">Tasks</a></li>
</ul>

如此,即可完成侧边栏选中。

总结

本文中使用中间件实现了侧边栏的选中,简单介绍了中间件的使用。
但本文方案也有不少缺陷,如严重依赖于主机名之后的模块名。

Laravel后台系统实战(三):任务创建及管理

发表于 2016-03-30   |   分类于 Laravel实战   |  

在实际应用中,订单类型的操作会很多,如订单操作中的订单创建、列表显示、删除、修改、分页等,本章以此为例,简要介绍其在Laravel中的应用。
此文借鉴了Laravel的quickshtart。
本文项目的GitHub地址为:GitHub地址,可参考。

基本MVC实例

创建模型

使用Artisan创建Model:

1
php artisan make:model Task

任务与任务的创建者相关,因此,默认只显示当前用户对应的任务,故TaskModel为:

1
2
3
4
5
6
7
8
9
10
11
12
13
14
15
16
17
18
19
20
21
22
23
24
25
26
27
28
29
30
31
32
33
<?php

namespace App;

use App\User;
use Illuminate\Database\Eloquent\Model;

class Task extends Model
{

/**
* The attributes that are mass assignable.
*
* @var array
*/

protected $fillable = ['name'];

/**
* The attributes that should be cast to native types.
*
* @var array
*/

protected $casts = [
'user_id' => 'int',
];

/**
* Get the user that owns the task.
*/

public function user()
{

return $this->belongsTo(User::class);
}
}

创建控制器

使用Artisan创建Controller:

1
php artisan make:controller TaskController

将task相关的所有请求路由到TaskController中,因此,在routes.php中增加task的resource:

1
2
3
4
5
Route::group(['middleware' => ['web']], function () {
Route::resource('task', 'TaskController');
Route::resource('user', 'UserController');
Route::auth();
});

在Controller中,定义获取list、创建、删除的方法,根据Laravel Controller定义分别为index、store、destroy,实现如下:

1
2
3
4
5
6
7
8
9
10
11
12
13
14
15
16
17
18
19
20
21
22
23
24
25
26
27
28
29
30
31
32
33
34
35
36
37
38
39
40
41
42
43
44
45
46
47
48
49
50
51
52
53
54
55
56
57
58
59
60
61
62
<?php

namespace App\Http\Controllers;

use Illuminate\Http\Request;

use App\Http\Requests;
use App\Http\Controllers\Controller;

use App\Task;

class TaskController extends Controller
{

/**
* Display a list of all of the user's task.
*
* @param Request $request
* @return Response
*/

public function index(Request $request)
{

return view('tasks.index', [
'tasks' => Task::orderBy('created_at', 'asc')->get()
]);
}

/**
* Create a new task.
*
* @param Request $request
* @return Response
*/

public function store(Request $request)
{

$validator = Validator::make($request->all(), [
'name' => 'required|max:255',
]);
if ($validator->fails()) {
return redirect('/tasks')
->withInput()
->withErrors($validator);
}
$task = new Task;
$task->name = $request->name;
$task->save();
return redirect('/tasks');
}

/**
* Destroy the given task.
*
* @param Request $request
* @param Task $task
* @return Response
*/

public function destroy(Request $request, Task $task)
{

Task::findOrFail($id)->delete();

return redirect('/tasks');
}
}

创建视图

根据Controller中的定义,定义默认task的视图。在resources/views下创建tasks的文件夹,然后在其中创建index.blade.php的文件,其内容为:

1
2
3
4
5
6
7
8
9
10
11
12
13
14
15
16
17
18
19
20
21
22
23
24
25
26
27
28
29
30
31
32
33
34
35
36
37
38
39
40
41
42
43
44
45
46
47
48
49
50
51
52
53
54
55
56
57
58
59
60
61
62
63
64
65
66
67
68
69
70
71
72
73
74
75
76
77
78
@extends('layouts.app')

@section('content')
<div class="container">
<div class="col-sm-offset-2 col-sm-8">
<div class="panel panel-default">
<div class="panel-heading">
New Task
</div>

<div class="panel-body">
<!-- Display Validation Errors -->
@include('common.errors')

<!-- New Task Form -->
<form action="/task" method="POST" class="form-horizontal">
{{ csrf_field() }}

<!-- Task Name -->
<div class="form-group">
<label for="task-name" class="col-sm-3 control-label">Task</label>

<div class="col-sm-6">
<input type="text" name="name" id="task-name" class="form-control" value="{{ old('task') }}">
</div>
</div>

<!-- Add Task Button -->
<div class="form-group">
<div class="col-sm-offset-3 col-sm-6">
<button type="submit" class="btn btn-default">
<i class="fa fa-btn fa-plus"></i>Add Task
</button>
</div>
</div>
</form>
</div>
</div>

<!-- Current Tasks -->
@if (count($tasks) > 0)
<div class="panel panel-default">
<div class="panel-heading">
Current Tasks
</div>

<div class="panel-body">
<table class="table table-striped task-table">
<thead>
<th>Task</th>
<th>&nbsp;</th>
</thead>
<tbody>
@foreach ($tasks as $task)
<tr>
<td class="table-text"><div>{{ $task->name }}</div></td>

<!-- Task Delete Button -->
<td>
<form action="/task/{{ $task->id }}" method="POST">
{{ csrf_field() }}
{{ method_field('DELETE') }}

<button type="submit" id="delete-task-{{ $task->id }}" class="btn btn-danger">
<i class="fa fa-btn fa-trash"></i>Delete
</button>
</form>
</td>
</tr>
@endforeach
</tbody>
</table>
</div>
</div>
@endif
</div>
</div>
@endsection

此处将创建人物、列表展示以及删除人物均整合到该页面中。
同时,在app.blade.php中删除冗余的侧边栏导航,增加Tasks的导航。
如此,点击侧边栏的Tasks,可看到页面:
Tasks基本页面
其中数据通过seed填充。

基本MVC进阶

在用户登录及管理章节中,我们使用了Repository。同时,对于删除操作,一般而言,只允许该任务的创建者才拥有删除权限,因此,此处对以上的流程稍作优化。

创建Repository

在app/Repositories中创建TaskRepository.php,在其中使用用户权限管理,即为:

1
2
3
4
5
6
7
8
9
10
11
12
13
14
15
16
17
18
19
20
21
22
<?php

namespace App\Repositories;

use App\User;
use App\Task;

class TaskRepository
{

/**
* Get all of the tasks for a given user.
*
* @param User $user
* @return Collection
*/

public function forUser(User $user)
{

return Task::where('user_id', $user->id)
->orderBy('created_at', 'asc')
->get();
}
}

使用auth控制删除

首先在app/Policies中创建TaskPlolicy.php,限制destroy方法:

1
2
3
4
5
6
7
8
9
10
11
12
13
14
15
16
17
18
19
20
21
22
23
24
<?php

namespace App\Policies;

use App\User;
use App\Task;
use Illuminate\Auth\Access\HandlesAuthorization;

class TaskPolicy
{

use HandlesAuthorization;

/**
* Determine if the given user can delete the given task.
*
* @param User $user
* @param Task $task
* @return bool
*/

public function destroy(User $user, Task $task)
{

return $user->id === $task->user_id;
}
}

然后在app/Providers/AuthServiceProvider.php中添加到$policies中:

1
2
3
protected $policies = [
'App\Task' => 'App\Policies\TaskPolicy',
];

如此,可在Controller中使用。

改造Controller

在以上Repository和Policy基础上,改造Controller,如下:

1
2
3
4
5
6
7
8
9
10
11
12
13
14
15
16
17
18
19
20
21
22
23
24
25
26
27
28
29
30
31
32
33
34
35
36
37
38
39
40
41
42
43
44
45
46
47
48
49
50
51
52
53
54
55
56
57
58
59
60
61
62
63
64
65
66
67
68
69
70
71
72
73
74
75
76
77
78
79
80
81
82
<?php

namespace App\Http\Controllers;

use Illuminate\Http\Request;

use App\Http\Requests;
use App\Http\Controllers\Controller;

use App\Task;
use App\Repositories\TaskRepository;

class TaskController extends Controller
{

/**
* The task repository instance.
*
* @var TaskRepository
*/

protected $tasks;

/**
* Create a new controller instance.
*
* @param TaskRepository $tasks
* @return void
*/

public function __construct(TaskRepository $tasks)
{

$this->middleware('auth');

$this->tasks = $tasks;
}

/**
* Display a list of all of the user's task.
*
* @param Request $request
* @return Response
*/

public function index(Request $request)
{

return view('tasks.index', [
'tasks' => $this->tasks->forUser($request->user()),
]);
}

/**
* Create a new task.
*
* @param Request $request
* @return Response
*/

public function store(Request $request)
{

$this->validate($request, [
'name' => 'required|max:255',
]);

$request->user()->tasks()->create([
'name' => $request->name,
]);

return redirect('/task');
}

/**
* Destroy the given task.
*
* @param Request $request
* @param Task $task
* @return Response
*/

public function destroy(Request $request, Task $task)
{

$this->authorize('destroy', $task);

$task->delete();

return redirect('/task');
}
}

其中通过构造方法注入Repository,并使用$this->authorize(‘destroy’, $task)判断删除操作时候被授权,若未被授权,则该操作终止。

分页

当任务太过,上百甚至上千时,需要使用分页显示。Laravel中自带了分页功能,可通过该功能快速地实现分页,以及下一页等的URL,同时提供了前端显示的基于Bootstrap的demo。
Laravel提供了paginate方法用于分页,可在query builder以及Eloquent query中使用。如以上实例中,需要对分页显示20条数据,则将TaskRepository中的方法改为:

1
2
3
4
5
6
public function forUser(User $user)
{

return Task::where('user_id', $user->id)
->orderBy('created_at', 'asc')
->paginate(20);
}

增加paginate方法。
增加之后,可看到返回的数据中增加了分页信息,如示例所示:

1
2
3
4
5
6
7
8
9
10
11
12
13
14
15
16
17
18
19
20
21
22
23
24
25
26
27
28
29
30
31
32
33
34
35
36
37
38
39
40
41
42
43
44
45
46
47
48
49
50
51
52
53
54
55
56
57
58
59
60
61
62
63
64
65
66
67
68
69
70
71
72
73
74
75
76
77
78
79
80
81
82
{
"total": 23273,
"per_page": 10,
"current_page": 1,
"last_page": 1164,
"next_page_url": "http://localhost/task?page=2",
"prev_page_url": null,
"from": 1,
"to": 20,
"data": [
{
"id": 3,
"user_id": 1,
"name": "damye test task",
"created_at": "2016-03-18 09:01:07",
"updated_at": "2016-03-18 09:01:07"
},

{
"id": 4,
"user_id": 1,
"name": "test controller",
"created_at": "2016-03-18 10:06:36",
"updated_at": "2016-03-18 10:06:36"
},

{
"id": 5,
"user_id": 1,
"name": "432342",
"created_at": "2016-03-18 10:09:53",
"updated_at": "2016-03-18 10:09:53"
},

{
"id": 6,
"user_id": 1,
"name": "PejSLfbKwV",
"created_at": "2016-03-29 08:04:30",
"updated_at": "2016-03-29 08:04:30"
},

{
"id": 7,
"user_id": 1,
"name": "mAfmaBCsUS",
"created_at": "2016-03-29 08:04:30",
"updated_at": "2016-03-29 08:04:30"
},

{
"id": 17,
"user_id": 1,
"name": "VbVV5J7VvH",
"created_at": "2016-03-29 08:04:31",
"updated_at": "2016-03-29 08:04:31"
},

{
"id": 18,
"user_id": 1,
"name": "XQwXK9BeGE",
"created_at": "2016-03-29 08:04:31",
"updated_at": "2016-03-29 08:04:31"
},

{
"id": 19,
"user_id": 1,
"name": "3JhnyOLMgQ",
"created_at": "2016-03-29 08:04:31",
"updated_at": "2016-03-29 08:04:31"
},

{
"id": 20,
"user_id": 1,
"name": "fGx83BzjU6",
"created_at": "2016-03-29 08:04:31",
"updated_at": "2016-03-29 08:04:31"
},

{
"id": 21,
"user_id": 1,
"name": "9Az4ctR7lb",
"created_at": "2016-03-29 08:04:31",
"updated_at": "2016-03-29 08:04:31"
}

]
}

如此,后台返回的数据已带上分页信息。Laravel同时提供了基于Bootstrap的前端代码,在前端加上:

1
{!! $tasks->links() !!}

即可获得页码信息。
示例如图:
Tasks基本页面

总结

本文的方法中,将任务的创建、列表展示、删除合为一个页面,实际处理的时候可根据需求拆分,使用方法类似。
另外,css和js可根据前端的需求调整。

Laravel后台系统实战(二):用户登录及管理

发表于 2016-03-29   |   分类于 Laravel实战   |  

此章节主要介绍用户登录、认证部分,以及用户管理。其中用户认证使用Laravel内置的模块,而用户管理为一个完整的MVC应用实例。
本文项目的GitHub地址为:GitHub地址,可参考。

用户认证

Laravel集成了用户认证模块,通过该模块可实现用户登录、注册、重置密码等操作。下面,就此模块的最基本应用做简单介绍。

数据库表

在此之前,需先在config/app.php中配置数据库的相关信息。
在databases/migrations下默认有个php文件,该文件默认创建数据库表。为了此处应用,此处增加几个字段,完成后的php程序内容为:

1
2
3
4
5
6
7
8
9
10
11
12
13
14
15
16
17
18
19
20
21
22
23
24
25
26
27
28
29
30
31
32
33
34
35
<?php

use Illuminate\Database\Schema\Blueprint;
use Illuminate\Database\Migrations\Migration;

class CreateUsersTable extends Migration
{

/**
* Run the migrations.
*
* @return void
*/

public function up()
{

Schema::create('users', function (Blueprint $table) {
$table->increments('id');
$table->string('email');
$table->string('password');
$table->string('nickname');
$table->boolean('is_admin')->default(0);
$table->boolean('block')->default(0);
$table->timestamps();
});
}

/**
* Reverse the migrations.
*
* @return void
*/

public function down()
{

Schema::drop('users');
}
}

然后运行命令:

1
php artisan migrate

就可在数据库中看到一个users的数据库表。

模型(Model)

在app下,默认有个User.php的文件,该文件为Laravel默认的用户认证模型

路由及视图

鉴于用户登录、认证是大多数系统常见的功能需求,故Laravel将该功能默认集成在框架中,使用一个名为AuthenticatesAndRegistersUsers的trait实现用户登录相关逻辑。
使用时,可在路由中或者模型的构造方法中添加中间件auth使用,或者路由Route::auth()实现。
同时,视图也可快速创建,通过命令:

1
php artisan make:auth --views

通过该命令可创建用户登录、注册等视图,位于resources/views/auth之下。
如此,结合上一章节app.blade.php中的Login,可进入登录界面,如图所示:
Laravel登录demo

用户管理

用户注册完成后,此处添加用户管理模块。

模型

模型使用以上所述,Laravel自带的模型

控制器

为了方便管理,增强系统的可读性,此处创建UserController

1
php artisan make:controller UserController

然后在routes.php中定义路由:

1
2
3
4
Route::group(['middleware' => ['web']], function () {
Route::resource('user', 'UserController');
Route::auth();
});

其中web中间件为一个中间件组,其中包含cookie、session以及csrf攻击等组件。
所有user的请求均由UserController处理。
然后在Controller里面添加index方法,默认获取所有用户列表,代码为:

1
2
3
4
5
6
public function index(Request $request)
{

return view('users.list', [
'users' => User::all(),
]);
}

视图

在Controller里面配置的,用户列表的view地址为users.list,则需要在views文件夹下面新建一个users的文件下,然后在其下面新建一个名为list.blade.php的view文件。
首先,在app.balde.php文件中,增加User的侧边栏,侧边栏的代码为:

1
2
3
4
5
6
7
8
9
10
11
12
13
14
15
16
17
<div class="col-sm-3 col-md-2 sidebar">
<ul class="nav nav-sidebar">
<li><a href="{{ url('/user') }}">Users</a></li>
</ul>
<ul class="nav nav-sidebar">
<li><a href="">Nav item</a></li>
<li><a href="">Nav item again</a></li>
<li><a href="">One more nav</a></li>
<li><a href="">Another nav item</a></li>
<li><a href="">More navigation</a></li>
</ul>
<ul class="nav nav-sidebar">
<li><a href="">Nav item again</a></li>
<li><a href="">One more nav</a></li>
<li><a href="">Another nav item</a></li>
</ul>
</div>

如此,通过点击侧边栏的Users,即可访问UserController里面的index方法。
然后完成list.blade.php。代码如下:

1
2
3
4
5
6
7
8
9
10
11
12
13
14
15
16
17
18
19
20
21
22
23
24
25
26
27
28
29
30
31
32
33
34
35
36
37
38
39
40
41
42
43
44
45
46
47
48
49
50
51
52
@extends('layouts.app')

@section('content')
<div class="container">
<div class="col-sm-offset-1 col-sm-8">

{{ csrf_field() }}

<!-- Current Tasks -->
@if (count($users) > 0)
<div class="panel panel-default">
<div class="panel-heading">
Current Users
</div>

<div class="panel-body">
<table class="table table-striped user-table">
<thead>
<th>ID</th>
<th>Email</th>
<th>name</th>
<th>Management</th>
</thead>
<tbody>
@foreach ($users as $user)
<tr>
<td class="table-text"><div>{{ $user->id }}</div></td>
<td class="table-text"><div>{{ $user->email }}</div></td>
<td class="table-text"><div>{{ $user->name }}</div></td>

<!-- Task Delete Button -->
<td>
<form action="/task/{{ $user->id }}" method="POST">
{{ csrf_field() }}
{{ method_field('DELETE') }}

<button type="submit" id="delete-task-{{ $user->id }}" class="btn btn-danger">
<i class="fa fa-btn fa-trash"></i>Delete
</button>
</form>
</td>
</tr>
@endforeach
</tbody>
</table>
</div>
</div>
@endif

</div>
</div>
@endsection

如此可获得用户列表,如图所示:
用户列表demo

使用依赖注入

Laravel的服务容器是整个框架的一个较强大的特性,其能多DB操作解耦,对测试有较大的方便。
下面,就该功能简要介绍。

创建Repository

在app/Repositories目录下新增一个UserRepository:

1
2
3
4
5
6
7
8
9
10
11
12
13
14
15
16
17
<?php

namespace App\Repositories;

use App\User;

class UserRepository
{

/**
* @desc get all users
* @return \Illuminate\Database\Eloquent\Collection|static[]
*/

public function selectAll()
{

return User::all();
}
}

注入Repository

创建完成后,到Controller中注入该实例,如在index方法中,注入后的Controller为:

1
2
3
4
5
6
7
8
9
10
11
12
13
14
15
16
17
18
19
20
21
22
23
24
25
26
27
28
29
30
31
32
33
34
35
36
37
38
39
40
41
42
43
44
45
46
47
48
49
<?php

namespace App\Http\Controllers;

use Illuminate\Http\Request;

use App\Http\Requests;
use App\Http\Controllers\Controller;

use App\User;
use App\Repositories\UserRepository;

class UserController extends Controller
{

/**
* The task repository instance.
*
* @var TaskRepository
*/

protected $users;

private $module = 'user';

/**
* Create a new controller instance.
*
* @param TaskRepository $tasks
* @return void
*/

public function __construct(UserRepository $users)
{

$this->middleware('auth');

$this->users = $users;
}

/**
* Display a list of all of the user's task.
*
* @param Request $request
* @return Response
*/

public function index(Request $request)
{

return view('users.list', [
'users' => $this->users->selectAll(),
]);
}
}

如此,实现的功能与以上相同,同时使用了依赖注入。

Laravel后台系统实战(一):安装

发表于 2016-03-29   |   分类于 Laravel实战   |  

简介

本系列文章为Laravel搭建后台管理系统的实战,相关信息如下:

后台:Laravel 5.2
前端框架:Bootstrap

本文项目的GitHub地址为:GitHub地址,可参考。

安装Laravel

Laravel的安装科参照另一篇博文Laravel随笔(一):简介。
安装完成之后,需运行(若在墙内,建议先配置composer中国镜像,参考composer中国全量镜像):

1
composer install

安装依赖。若有需求,可在composer.json中配置。
若要使用elixir管理js和css,还需安装gulp,安装命令如下:

1
2
3
# 若在国内,可配置cnpm
npm install
npm install --global gulp

成功安装完成后,使用命令:

1
gulp

即可less、scss等文件。具体可参照Laravel elixir

使用Bootstrap

本文参照Bootstrap是dashboard实例。
Bootstrap的css和js使用CDN地址,若使用本地的相对路径的,需将css和js包放到public文件夹之下,然后引入使用相对路径。
此处在resources下的views文件夹下,新建一个layouts的文件夹,用于存放布局相关的代码,如后台页面中的顶部、侧边栏等。
然后新建文件app.blade.php,根据Bootstrap的dashboard中的demo,代码为:

1
2
3
4
5
6
7
8
9
10
11
12
13
14
15
16
17
18
19
20
21
22
23
24
25
26
27
28
29
30
31
32
33
34
35
36
37
38
39
40
41
42
43
44
45
46
47
48
49
50
51
52
53
54
55
56
57
58
59
60
61
62
63
64
65
66
67
68
69
70
71
72
73
74
75
76
77
78
79
80
81
82
83
84
85
86
87
88
89
90
91
92
93
94
95
96
97
98
99
100
101
102
103
104
105
106
107
108
109
110
111
112
113
114
<!DOCTYPE html>
<html lang="en">
<head>
<meta charset="utf-8">
<meta http-equiv="X-UA-Compatible" content="IE=edge">
<meta name="viewport" content="width=device-width, initial-scale=1">
<!-- The above 3 meta tags *must* come first in the head; any other head content must come *after* these tags -->
<meta name="description" content="">
<meta name="author" content="">

<title>BetMe</title>

<link href="font/lato.css" rel='stylesheet' type='text/css'>

<!-- Bootstrap core CSS -->
<link href="//cdn.bootcss.com/bootstrap/3.3.5/css/bootstrap.min.css" rel="stylesheet">

<!-- Custom styles for this template -->
<link href="css/dashboard.css" rel="stylesheet">

<style>
body {
font-family: 'Lato';
}


.fa-btn {
margin-right: 6px;
}

</style>

</head>

<body>

<nav class="navbar navbar-inverse navbar-fixed-top">
<div class="container-fluid">
<div class="navbar-header">
<button type="button" class="navbar-toggle collapsed" data-toggle="collapse" data-target="#navbar" aria-expanded="false" aria-controls="navbar">
<span class="sr-only">Toggle navigation</span>
<span class="icon-bar"></span>
</button>
<a class="navbar-brand" href="#">BetMe</a>
</div>
<div id="navbar" class="navbar-collapse collapse">
<!-- Left Side Of Navbar -->
<ul class="nav navbar-nav">
<li><a href="{{ url('/home') }}">Home</a></li>
<li><a href="{{ url('/user') }}">Users</a></li>
</ul>

<ul class="nav navbar-nav navbar-right">
@if (Auth::guest())
<li><a href="{{ url('/login') }}">Login</a></li>
<li><a href="{{ url('/register') }}">Register</a></li>
@else
<li class="dropdown">
<a href="#" class="dropdown-toggle" data-toggle="dropdown" role="button" aria-expanded="false">
{{ Auth::user()->name }} <span class="caret"></span>
</a>

<ul class="dropdown-menu" role="menu">
<li><a href="{{ url('/logout') }}"><i class="fa fa-btn fa-sign-out"></i>Logout</a></li>
</ul>
</li>
@endif
</ul>
<form class="navbar-form navbar-right">
<input type="text" class="form-control" placeholder="Search...">
</form>
</div>
</div>
</nav>

<div class="container-fluid">
<div class="row">
<div class="col-sm-3 col-md-2 sidebar">
<ul class="nav nav-sidebar">
<li><a href="">user</a></li>
</ul>
<ul class="nav nav-sidebar">
<li><a href="">Nav item</a></li>
<li><a href="">Nav item again</a></li>
<li><a href="">One more nav</a></li>
<li><a href="">Another nav item</a></li>
<li><a href="">More navigation</a></li>
</ul>
<ul class="nav nav-sidebar">
<li><a href="">Nav item again</a></li>
<li><a href="">One more nav</a></li>
<li><a href="">Another nav item</a></li>
</ul>
</div>
<div class="col-sm-9 col-sm-offset-3 col-md-10 col-md-offset-2 main">
@yield('content')
</div>
</div>
</div>

<!-- Bootstrap core JavaScript
================================================== -->

<!-- Placed at the end of the document so the pages load faster -->
<script src="//cdn.bootcss.com/jquery/2.2.1/jquery.min.js"></script>
<script src="//cdn.bootcss.com/bootstrap/3.3.5/js/bootstrap.min.js"></script>

{{--<script type="text/javascript">--}}
{{--$(".nav a").on("click", function(){--}}
{{--$(".nav").find(".active").removeClass("active");--}}
{{--$(this).parent().addClass("active");--}}
{{--});--}}
{{--
</script>--}}


</body>
</html>

再将Laravel中自带的welcome.blade.php改写为:

1
2
3
4
5
6
7
8
9
10
11
12
13
@extends('layouts.app')

@section('content')
<div class="col-md-10 col-md-offset-1">
<div class="panel panel-default">
<div class="panel-heading">Welcome</div>

<div class="panel-body">
Your Application's Landing Page.
</div>
</div>
</div>
@endsection

此处使用Laravel中的blade模板,在welcome.blade.php中引入了app.blade.php,app.blade.php作为后台管理系统中的公共部分。
然后在routes.php中配置默认路由:

1
2
3
Route::get('/', function () {
return view('welcome');
});

即可访问后台管理系统的默认页面,如图所示。
Laravel后台系统demo

node-gyp编译问题

发表于 2016-03-28   |   分类于 node   |  

这两天学习Laravel,管理及编译前端代码的时候用到了elixir,但在windows下,npm(cnpm) install的时候报错,大概意思是需要编译,而编译依赖于VC++和python 2.7。网上的解决方案大多为配置VS以及Python 2.7环境,但不想额外配置环境,终于找到一个无需编译的解决方案,此处mark。

错误描述

使用gulp命令时报错如下:

1
2
3
4
5
6
7
8
9
10
11
12
13
14
15
16
17
18
19
20
21
[20:02:53] Using gulpfile D:\XXX\Dev\gulpfile.js
[20:02:53] Starting 'default'...
[20:02:53] Starting 'sass'...
[20:02:53] 'sass' errored after 83 ms
[20:02:53] Error: The `libsass` binding was not found in D:\XXX\Dev\node_mod
This usually happens because your node version has changed.
Run `npm rebuild node-sass` to build the binding for your current node version.
at Object.sass.getBinaryPath (D:\XXX\Dev\node_modules\.npminstall\node-s
at Object.<anonymous> (D:\XXX\Dev\node_modules\.npminstall\node-sass\3.4
at Module._compile (module.js:409:26)
at Object.Module._extensions..js (module.js:416:10)
at Module.load (module.js:343:32)
at Function.Module._load (module.js:300:12)
at Module.require (module.js:353:17)
at require (internal/module.js:12:17)
at Object.<anonymous> (D:\XXX\Dev\node_modules\.npminstall\gulp-sass\2.2
at Module._compile (module.js:409:26)
[20:02:53] Error in plugin 'run-sequence'
Message:
An error occured in task 'sass'.
[20:02:53] Finished 'default' after 121 ms

因此需要重新编译,执行命令

1
2
# 使用cnpm(墙内)
npm rebuild node-sass

而又报错如下:

1
2
3
4
5
6
7
8
9
10
11
12
13
14
15
16
17
18
19
20
21
22
23
24
25
26
27
28
29
30
31
32
33
34
35
36
37
gyp ERR! configure error
gyp ERR! stack Error: Can't find Python executable "python", you can set the PYTHON env
gyp ERR! stack at failNoPython (D:\XXX\Dev\node_modules\.npminstall\node
gyp ERR! stack at D:\XXX\Dev\node_modules\.npminstall\node-gyp\3.3.1\nod
gyp ERR! stack at FSReqWrap.oncomplete (fs.js:82:15)
gyp ERR! System Windows_NT 6.1.7601
gyp ERR! command "C:\\Program Files\\nodejs\\node.exe" "D:\\XXX\\Dev\\node_m
erbose" "--libsass_ext=" "--libsass_cflags=" "--libsass_ldflags=" "--libsass_library="
gyp ERR! cwd D:\XXX\Dev\node_modules\laravel-elixir\node_modules\gulp-sass\n
gyp ERR! node -v v4.4.1
gyp ERR! node-gyp -v v3.3.1
gyp ERR! not ok
Build failed

npm ERR! Windows_NT 6.1.7601
npm ERR! argv "C:\\Program Files\\nodejs\\node.exe" "C:\\Users\\Administrator\\AppData\\
fig=C:\\Users\\Administrator\\.cnpmrc" "--disturl=https://npm.taobao.org/mirrors/node" "
npm ERR! node v4.4.1
npm ERR! npm v3.8.3
npm ERR! code ELIFECYCLE
npm ERR! node-sass@3.4.2 postinstall: `node scripts/build.js`
npm ERR! Exit status 1
npm ERR!
npm ERR! Failed at the node-sass@3.4.2 postinstall script 'node scripts/build.js'.
npm ERR! Make sure you have the latest version of node.js and npm installed.
npm ERR! If you do, this is most likely a problem with the node-sass package,
npm ERR! not with npm itself.
npm ERR! Tell the author that this fails on your system:
npm ERR! node scripts/build.js
npm ERR! You can get information on how to open an issue for this project with:
npm ERR! npm bugs node-sass
npm ERR! Or if that isn't available, you can get their info via:

npm ERR! npm owner ls node-sass
npm ERR! There is likely additional logging output above.

npm ERR! Please include the following file with any support request:
npm ERR! D:\XXX\Dev\npm-debug.log

提示编译需要Python环境。

解决方案

在cnodejs论坛上发现了一个类似的帖子,在回复的最后发现了一个答案,即先安装bcryptjs,则可不需要编译。
测试通过!
附上cnpm上的链接

1
http://npm.taobao.org/package/bcryptjs

Laravel随笔(三):优化相关

发表于 2016-03-17   |   分类于 laravel   |  

此文主要介绍Laravel框架中提供的优化方面的知识,后续有遇到的会进一步更新。
该部分方式在发布项目时可考虑添加。

路由优化

若应用中仅使用基于controller的路由,可使用Laravel的路由缓存(route cache)。可极大地减少路由注册的时间,提高访问数据。个例可提高100倍的速度。生成route:cache命令为:

1
php artisan route:cache

若新增了路由,需再次执行以上的命令。
若删除,执行:

1
php artisan route:clear

即可。

注意:路由缓存不支持匿名函数的路由,若要使用,请转换为controller路由。

123
dam叶

dam叶

Lazy boy write lazy blog

29 日志
15 分类
31 标签
RSS
github weibo zhihu
© 2016 dam叶
由 Hexo 强力驱动
主题 - NexT.Muse