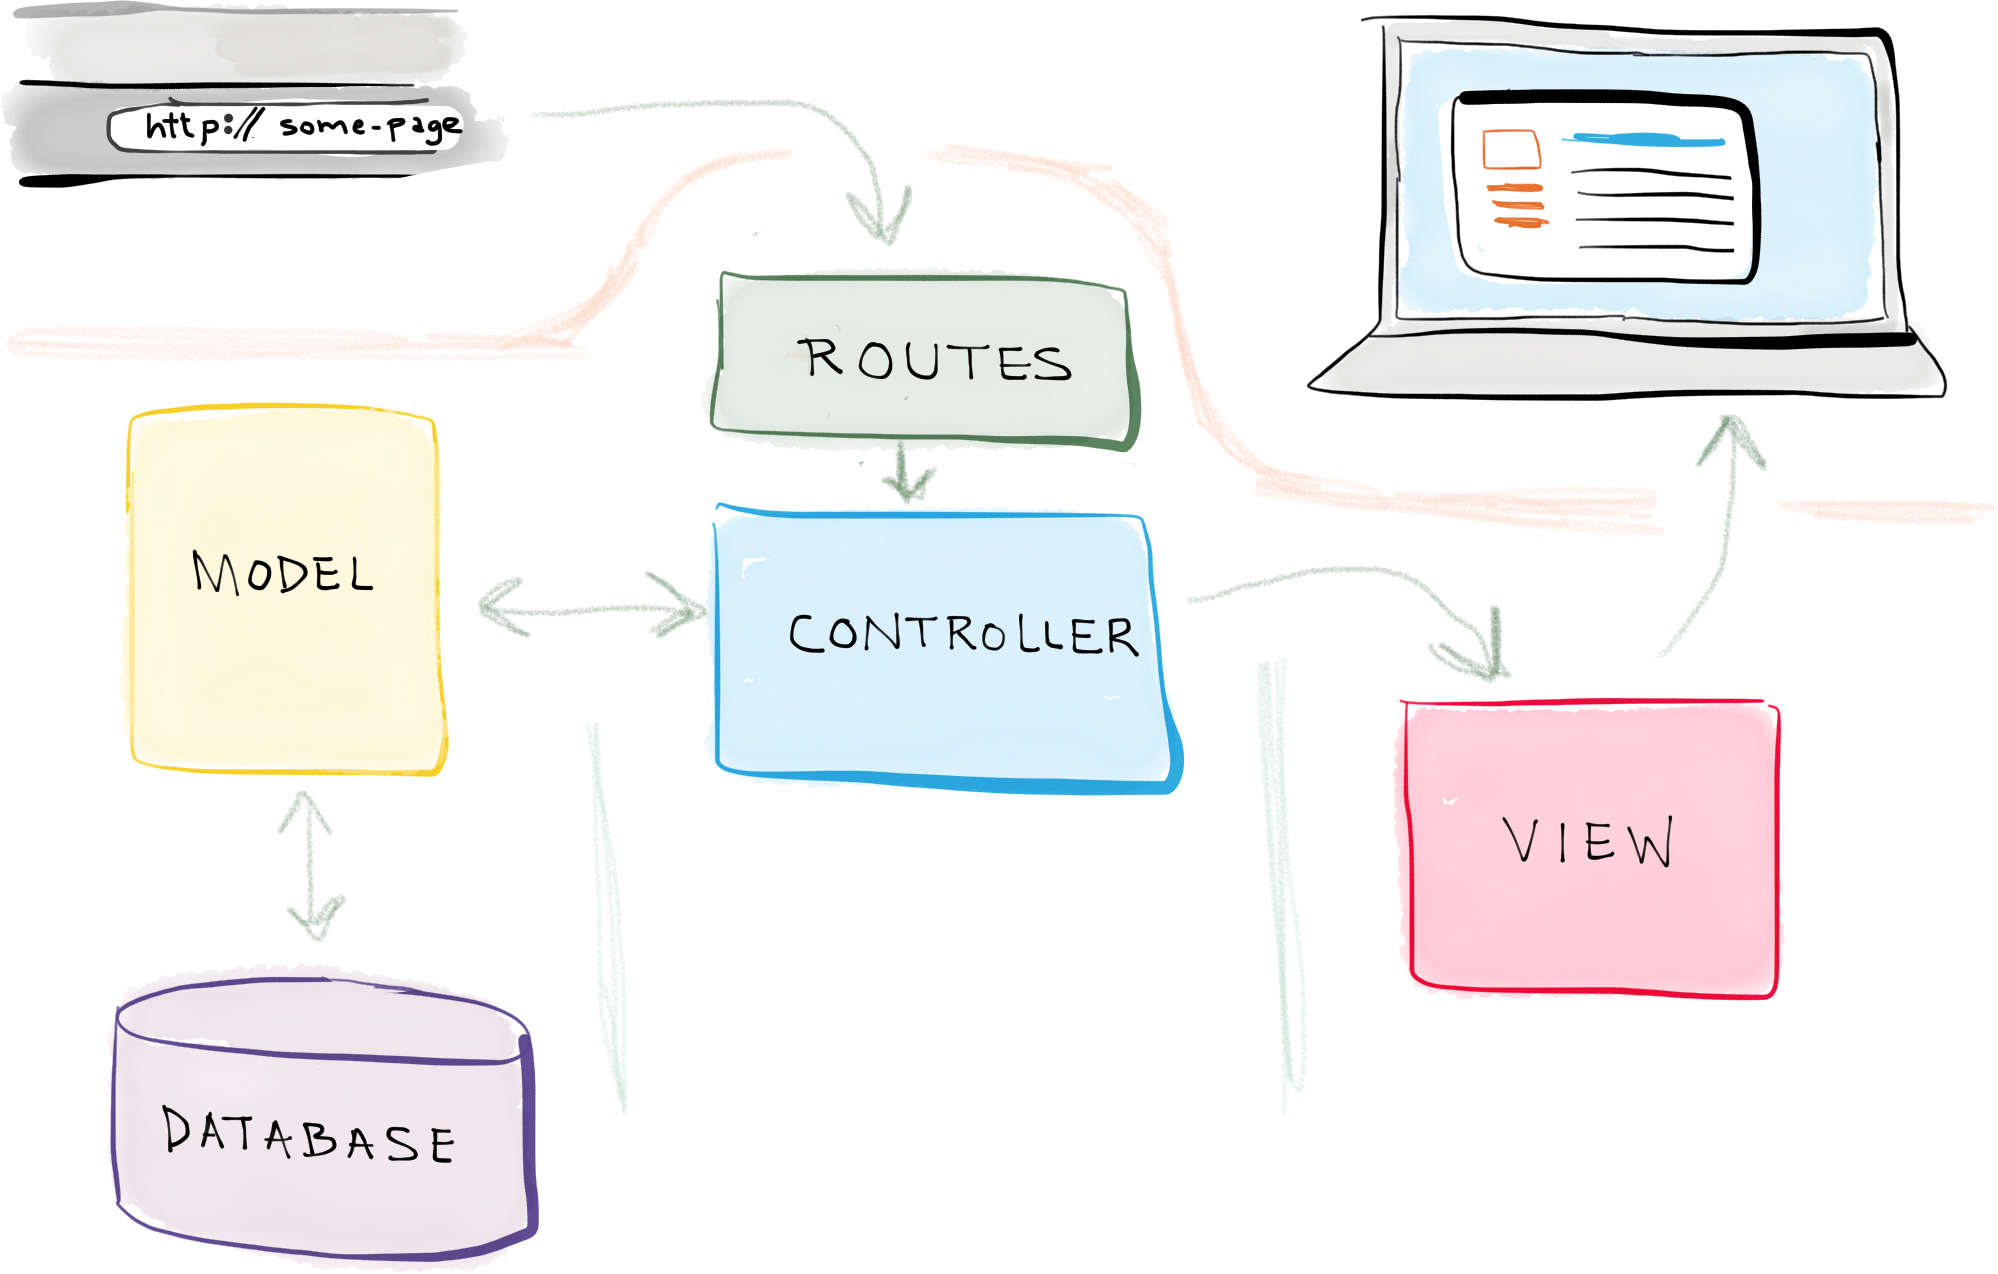
Laravel遵从MVC的设计原则,同时,routes用于映射URL到具体的controller,示例如图所示
数据图片来源于self-taught coders。
因此,一个完整的访问流程可以总结为:
- 用户输入URL访问应用
- route映射URL和对应的controller
- controller通过model访问数据库,获取数据,并将其传输到view
- view渲染前台页面
下面,通过实例简要介绍Laravel 5的MVC应用。
Model
以车辆为例,创建一个Model。在此之前,首先要设置DB
Laravel DB设置
Laravel的DB可在env文件中简单配置,也可在config/database.php文件中配置,若同时存在,则会已env文件中读取的为主。为了避免引起歧义,此处将读取env环境变量的函数(如env(‘DB_HOST’, ‘localhost’))去除。本文使用MySQL,设置host、database、username、password,示例如下:1
2
3
4
5
6
7
8
9
10
11
12
13
14
15'default' => 'mysql',
'mysql' => [
'driver' => 'mysql',
'host' => 'localhost',
'database' => 'test',
'username' => 'develop',
'password' => 'develop',
'charset' => 'utf8',
'collation' => 'utf8_unicode_ci',
'prefix' => '',
'strict' => false,
'engine' => null,
],
],
如此,默认的DB连接为MySQL,连接为”mysql”,如上所示。
创建Model
此处安利Laravel自带的Artisan CLI工具,其中集成了大量的命令。
使用Artisan CLI创建一个Model,命令如下:1
2# 创建Model,同时写入数据库(--migration)
php artisan make:model Car --migration
创建完成后,在app下有个Car.php的文件,该文件即为通过Artisan创建的Model,文件内容为:1
2
3
4
5
6
7
8
9
10<?php
namespace App;
use Illuminate\Database\Eloquent\Model;
class Car extends Model
{
//
}
同时,Laravel支持通过Artisan工具创建数据库表。因此,在database\migrations下生成了一个2016_03_15_124343_create_cars_table.php文件,内容为:1
2
3
4
5
6
7
8
9
10
11
12
13
14
15
16
17
18
19
20
21
22
23
24
25
26
27
28
29
30<?php
use Illuminate\Database\Schema\Blueprint;
use Illuminate\Database\Migrations\Migration;
class CreateCarsTable extends Migration
{
/**
* Run the migrations.
*
* @return void
*/
public function up()
{
Schema::create('cars', function (Blueprint $table) {
$table->increments('id');
$table->timestamps();
});
}
/**
* Reverse the migrations.
*
* @return void
*/
public function down()
{
Schema::drop('cars');
}
}
此处对数据库表增加几个make、model、produced_on这三个属性。1
2
3
4
5
6
7Schema::create('cars', function (Blueprint $table) {
$table->increments('id');
$table->string('make');
$table->string('model');
$table->string('produced_on');
$table->timestamps();
});
然后在执行migrate命令:1
php artisan migrate
数据库中则成功创建表:cars。然后,可使用Database: Seeding填充数据。本文此处略过。
创建Controller
在Laravel中,一个对象,如上面创建的Car,被定义为resource,对于每个resource,Laravel中普遍使用resource controller管理关于该资源的所有请求。此处可用Artisan命令行创建controller:1
php artisan make:controller CarController
会生成一个controller文件,路径为:app/Http/Controllers/CarController.php,文件为:1
2
3
4
5
6
7
8
9
10
11
12
13
14
15
16
17
18<?php
namespace App\Http\Controllers;
use Illuminate\Http\Request;
use App\Http\Requests;
use App\Car;
class CarController extends Controller
{
public function index()
{
$car = Car::all();
return view('cars.all', array('cars' => $car));
}
}
routes
然后定义routes,在app/Http/routes.php中增加以下代码:1
Route::resource('cars', 'CarController');
routes介绍参照官网。
创建view
Laravel默认使用blade模板引擎渲染前端页面
此处展示所有车辆,首先根据以上的路由配置,在controller里面配置index函数,默认返回所有车辆数据。代码如下:1
2
3
4
5
6
7
8
9
10
11
12
13
14
15
16<?php
namespace App\Http\Controllers;
use Illuminate\Http\Request;
use App\Http\Requests;
class CarController extends Controller
{
public function index()
{
$car = Car::findAll();
return view('cars.show', array('car' => $car));
}
}
然后创建view文件,路径为:resources/views/cars/all.blade.php,使用blade模板引擎渲染数据,demo如下:1
2
3
4
5
6
7
8
9
10
11
12
13
14
15
16
17
18
19
20
21
22
23
24
25
26
27
28
29
30
31
32
33
34
35
36
37
38
39
40
41
42
43
44
45
46
47
48
49
50<!DOCTYPE html>
<html>
<head>
<title>Laravel</title>
<h2nk href="https://fonts.googleapis.com/css?family=Lato:100" rel="stylesheet" type="text/css">
<style>
html, body {
height: 100%;
}
body {
margin: 0;
padding: 0;
width: 100%;
display: table;
font-weight: 100;
font-family: 'Lato';
}
.container {
text-ah2gn: center;
display: table-cell;
vertical-ah2gn: middle;
}
.content {
text-ah2gn: center;
display: inh2ne-block;
}
.title {
font-size: 96px;
}
</style>
</head>
<body>
<div class="container">
<div class="content">
@foreach($cars as $car)
<h1>Car {{ $car->id }}</h1>
<h2>{{ $car->make }}</h2>
<h2>{{ $car->model }}</h2>
<h2>{{ $car->produced_on }}</h2>
@endforeach
</div>
</div>
</body>
</html>
访问链接:http://localhost/cars ,效果如图所示。